Dedicated home theater room: how to plan and build one
A room that does one thing can do it properly. Here is how to choose it, plan it, keep the sound in, and build it in the right order.
A dedicated room gives you three things a living room can’t: darkness, quiet and rows.
- Choose it by its neighbors and its length, then check its shape: RP22, the trade’s design practice, recommends a room 1.15 to 1.45 times as long as it is wide.
- Build a sealed shell, ceiling included. Walls are rated by STC, a single sound-blocking number; RP22’s target beside a bedroom is STC 60, or 70 where the bedroom must stay quiet.
- Expect bass to get out. At 50 Hz none of the seven lab-tested walls below that have a figure there stopped more than about 27 dB.
- Keep it quiet and dark: slow air, equipment outside the room, matte dark surfaces near the screen.
- Work in order: permits, framing, wiring and ducts, inspections, insulation, then drywall sealed all round. The platform, screen wall and decoration are built inside the finished shell.
- Budget about $3,300 for the drywall, damping compound and insulation of our example’s shell, or $5,300 with isolation clips. The door, floor, lumber and trades are extra.
On this page16 sections

What a dedicated room buys you
A living-room system shares its room with windows, a kitchen and everyone else’s evening. A dedicated room lets you control the three things that matter most to a movie: light (dark surfaces and no stray daylight, so the picture keeps its contrast), noise (a sealed shell, so quiet scenes stay quiet and loud ones stay in) and rows (a second row on a platform, every seat with a clear view).
This guide covers the room itself. For the equipment and the setup, from screen size to calibration, use our home theater setup guide; it prices complete systems by budget. If you came for a themed room, a movie palace or a starship bridge, the section on themes shows how to get the look without hurting the sound. If you want the sequence first, jump to the order of work.
Much of what follows leans on RP22, the Immersive Audio Design Recommended Practice published by CEDIA (the trade association for home-technology installers) with the Consumer Technology Association. It is the closest thing home theater design has to a standard.
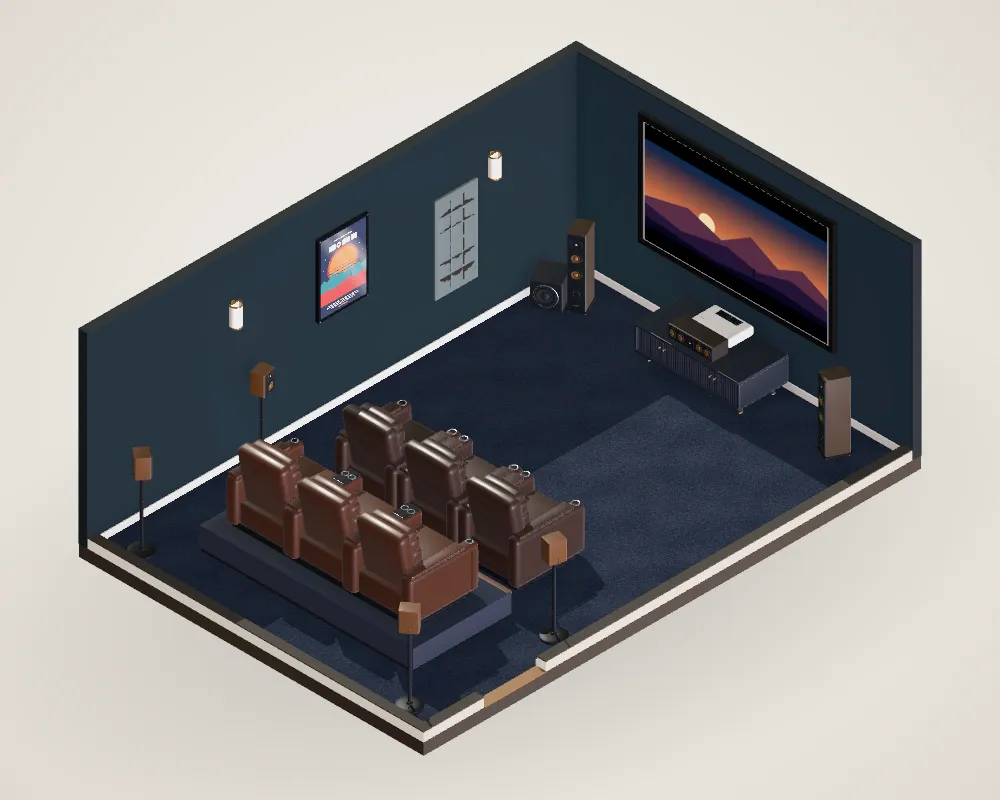
- 1Screen wall. Dark and matte. The center speaker sits on a low cabinet under the screen. The projector (dashed) hangs from the ceiling behind the front row, with its top 6 inches down: that leaves 6 ft 10 in over the platform under a projector 5 inches tall.
- 2Front speakers and subwoofer. Left and right beside the screen, 26° either side of the main seat. The subwoofer starts near a front corner; the setup guide shows how to find its best spot.
- 3Front row. Eyes 11½ ft from a 120-inch screen, which fills 41° of the view. The seats and the screen sit 3 inches left of the room’s center line, to widen the aisle.
- 4Platform and back row. A 15-inch platform, wall to wall and back to the rear wall. The back row sees 27°. It has 36 inches of walkway in front with the seats upright; fully reclined (dashed), about 10.
- 5Surrounds. On the side walls just behind the front row, and on the back wall behind the back row: seven speakers and a subwoofer in all (7.1).
- 6Door and step. A solid door, sealed all the way round, beside the front row, so nobody crosses the picture. The aisle on that side is about 42 inches wide, and the platform’s one step runs across it behind the door. Each landing is the width of the step and 36 inches deep. No seat reclines into either, and 36 inches stay clear beside the surround speaker on that wall (5½ inches deep).
- 7Equipment. The receiver and amplifiers go in a ventilated closet or the next room, so their heat and fan noise stay outside.
- 8Air. A supply and a return in the ceiling, sized to move air slowly, which is what keeps it quiet.
- 9Treatment. Panels from about 3 ft to 9 ft along each side wall, where it bounces the front speakers toward the front row, and a bass trap in each front corner.
Choose the room
Start with the neighbors. Bass travels through any wall you can afford (the numbers are below), so a room that shares no wall or ceiling with a bedroom is worth more than a slightly bigger one that does.
Then the length and the ceiling. One row fits almost anywhere. Two reclining rows need length: the example uses all 21 ft, with the front row’s eyes 11½ ft from the screen, the back row’s 6½ ft behind them, and the rest, a little over 2½ ft, behind those for the seat backs and their recline. A second row also needs height: its platform takes a foot or more, and the model building code asks for 7 ft of ceiling in a room. We found nothing in it about seating platforms, so ask how yours measures. If it measures from the platform, the example’s 15-inch platform, a new ceiling and a new floor mean starting with about 8 ft 7 in (the sums are below).
Then the shape. A room’s dimensions set its bass resonances, and equal dimensions stack them on the same notes: in a 2021 model study, J. H. Rindel found that in a cube only 7 of the 24 gaps between the first 25 resonances are anything but zero. RP22 recommends a length 1.15 to 1.45 times the width, and a width more than 1.1 times the height but not a whole multiple of it. The example is 15 × 21 ft with a 9 ft ceiling: 1.40 and 1.67.
A room outside that range is not a bad room. RP22 says the models behind ideal ratios are “often not applicable”, that “no perfect ratio can be universally relied upon”, and that where the ratio can’t be helped, more subwoofers, careful subwoofer placement and equalization “can partially mitigate many negative outcomes”. Avoid a cube, and don’t shorten a long room just to hit a number. RP22 doesn’t say where to measure; we’d use the finished inside faces of the new walls.
Measure what will be left. No standard we found sets a minimum size. CEDIA’s consumer cost guide says mid-range setups “typically need a dedicated room of at least 12x15 feet”, with no calculation behind it. What counts is the room inside the new construction. The walls drawn below run from 4½ to 10 inches thick, so trading two ordinary side walls for the 9-inch double-stud wall takes about 9 inches off a room’s width, and for the 10-inch one about 11. A ceiling of two ⅝-inch sheets on isolation clips sits about 2⅝ inches below the joists, against ⅝ inch for a plain one (our arithmetic from the tested walls’ dimensions).
By kind of room:
- A spare room upstairs. The floor is the weak side: bass and footsteps go down through it. Plan one row, expect to work with finished walls (the finished-room route below), and ask an engineer before adding layers to a light floor or ceiling: two ⅝-inch sheets weigh about 4.6 lb per sq ft.
- A basement. Naturally dark and separate, with the room above as its weak side. It needs its own checks first: moisture, radon, ceiling height and an emergency exit, covered in our basement home theater guide.
- A garage. The most building: the big door opening framed in like the other walls, a floor over the slab, insulation, and heating and cooling of its own. Converting or altering a room commonly needs a building permit (Fairfax County, Virginia, for one, requires it); ask before you plan around it.
- A new house or an addition. The one case where you choose the dimensions. Use the proportions above, keep the room away from bedrooms on the plan, and have the shell, the air system and the conduit drawn before the framing starts.
A room with no window, a blocked window or a sealed door also runs into three building-code rules: daylight and fresh air, escape openings, and alarms.
Ask the building department first. One call, before you plan round the answers:
- Which permits and inspections does this work need, and which electrical work may an owner do?
- Does the room count as habitable, and does it need a window, outdoor air or an escape opening?
- Is the 7 ft ceiling height measured from a seating platform, and is the platform’s step a stair?
- Where does it want smoke and carbon-monoxide alarms, and what fireblocking does it accept in double walls?
What the 2021 model code says about windows, escape openings and alarms
These are the model residential code’s rules; your local version decides.
- Windows. A habitable room needs window area, unless it gets outdoor air mechanically (a whole-house ventilation system, or 0.35 air changes an hour for the room), has artificial light averaging 6 footcandles, and needs no escape opening. A supply and return that only recirculate the room’s own air don’t meet that.
- Escape openings. Basements and bedrooms need an emergency escape opening. Altering an existing basement without creating a bedroom does not require adding one. Any cover over an escape opening must be removable from the inside “without the use of a key or tool” or unusual force: a heavy plug screwed over the only escape window does not meet that.
- Alarms. Smoke alarms are required on every story, basements included, linked so that one sets off all (listed wireless links count). Alterations that need a permit generally bring the house’s smoke alarms up to the rule for new houses, and its carbon-monoxide alarms too where it has fuel-burning appliances or an attached garage; some kinds of work are exempt. A room built to keep sound in also keeps the hallway alarm out: put a linked alarm inside the theater, and ask the building department where it wants it.
Plan it from the seat
Before any framing, fix five things on paper, because walls, wiring and the platform all follow from them:
- Screen size and the front row. The picture should fill about 30 to 40° of your view: our setup guide explains that band and sizes the screen for your distance. In the example the front row’s eyes are 11½ ft from a 120-inch screen, which fills 41° of their view, and the back row, at 18 ft, sees 27°. For this screen the band is only about 4 ft deep, so two reclining rows 6½ ft apart can’t both sit in it, and the example straddles it. Projector or TV covers the choice past 100 inches.
- Rows. A second row needs a platform high enough to see the bottom of the screen over the heads in front, deep enough for the seats to recline, and a step whose landings no seat reclines into. Rows and the riser has the drawing and the sums.
- Picture shape. A 16:9 screen (the shape of a TV) or a wider 2.35:1 screen for films, with or without masking panels that close in on the picture. Decide before the screen wall is framed, because the shape sets its width and what has to be built round it.
- Speakers. Their positions decide where wire, blocking and any in-wall boxes go. See 7.1 placement (seven speakers around the seats and one subwoofer) and Dolby Atmos placement for speakers overhead.
- The door, the equipment, the projector and the air. Where people come in, where the electronics live, and how fresh air gets in and out without noise. The example hangs its projector from the ceiling behind the front row. That needs four things decided now: its distance from the screen (from the maker’s throw calculator for your screen size), something solid to bolt to, power and a cable path at that spot, and how low it hangs. The example’s is over the platform, where the floor is 15 inches higher, so it hangs close to the ceiling (its top 6 inches down). That leaves 6 ft 10 in under a projector 5 inches tall, and 6 ft 8 in under a 7-inch one; check the maker’s clearances for a mount that short. Its fan is then over the seats: check the maker’s noise figure.
Keep the sound in
Treatment is not isolation. Acoustic panels make the room sound better inside. They are not built to stop sound leaving. Isolation comes from the construction itself: mass (more drywall), separation (the two faces of a wall not sharing rigid framing), damping (a compound between sheets) and airtightness.
Set a target
Sound level is measured in decibels (dB) and pitch in hertz (Hz); bass is the low end, below about 125 Hz. Walls and ceilings are rated by STC (sound transmission class): one number worked out from how much sound a construction stops between 125 Hz and 4 kHz. RP22 sets the rating to build to by what is on the other side. A wall with earth behind it has no neighbor of its own to protect, but build it like the others: concrete carries sound round to the rest of the house, so a lining fixed hard to it becomes a path (our reasoning from RP22’s warnings about flanking and slab floors, below). For a wall to the outdoors, RP22 uses the same levels to keep outside noise out:
| On the other side | RP22 level | Build to |
|---|---|---|
| A hallway, a storage room, a basement with no loud machinery | Standard construction | STC 34 |
| A kitchen or dining room | Level 1 | STC 52 |
| A living room, bedroom or dining room | Level 2 | STC 60 |
| A bedroom that must stay quiet, or a noisy room next to the theater | Level 3: a consultant is recommended | STC 70 |
| Any neighbor, for RP22’s two highest grades of system | Level 4: a room within a room, and a consultant is mandatory | STC 80 |
RP22 lists bedrooms and dining rooms twice each; choose the row by how quiet that room must be. In its own examples, STC 60 is what keeps ordinary household noise (about 80 dB) out of a quiet theater, and hearing a loud system only faintly in the next room took about STC 70.
What the numbers mean for the ear. RP22’s examples work by subtraction: a finished room that measures 45 turns 85 dB into 40 dB next door. Carried over to lab ratings, with the 4 to 6 dB a finished room loses, 85 dB in the theater would arrive at about 37 to 39 dB behind a construction lab-rated STC 52 and about 29 to 31 dB behind STC 60. That is our simplified illustration, not a prediction: the level next door also depends on the size of the wall, on how much the room next door absorbs, and on every path round the wall. STC is worked out from 125 Hz up, so bass arrives louder than that, as the next section shows.
Two cautions come with the table. These are ratings as a lab measures the construction: RP22 expects a finished room to measure about 4 to 6 dB lower, and its examples allow for that. And STC starts at 125 Hz, above most movie bass, which is why RP22 calls the full measurement by frequency “more informative” than the single number.
What walls are worth
These are lab-tested walls, each a single specimen. Beside each rating is how many decibels the wall stopped at two bass frequencies:
drywallstudinsulationresilient or hat channelisolation clipdamping compound
-
One sheet each side on wood studs
- Rating
- STC 32
- At 50 Hz
- 21.5 dB
- At 100 Hz
- 16.3 dB
- Thick
- 4½ in
National Research Council Canada (NRC), TL-93-176: ½-inch Type X sheets, 2×4 studs at 16 in, the cavity filled with blown cellulose.
-
Two sheets each side
- Rating
- STC 38
- At 50 Hz
- 26.8 dB
- At 100 Hz
- 20.9 dB
- Thick
- 5½ in
NRC TL-93-174: the same wall with a second sheet on both sides.
-
Resilient channel on one side
- Rating
- STC 46
- At 50 Hz
- 17.7 dB
- At 100 Hz
- 16.7 dB
- Thick
- 5 in
NRC TL-93-125: one sheet each side, glass-fibre batts, thin metal channel at 24 in under one of them. See RP22’s caution below.
-
Staggered studs on a wider plate
- Rating
- STC 47
- At 50 Hz
- 15.0 dB
- At 100 Hz
- 20.0 dB
- Thick
- 6½ in
NRC TL-93-247: 2×4 studs staggered on a 2×6 plate, glass-fibre batts, one sheet each side.
-
Two sheets each side with damping compound
- Rating
- STC 55
- At 50 Hz
- 26 dB*
- At 100 Hz
- 26 dB
- Thick
- 6 in
Orfield Laboratories OL 05-1049: ⅝-inch sheets, studs at 24 in, insulated. Commissioned by the compound’s maker. * From the report’s appendix, which marks its figures below 80 Hz as “for reference only”.
-
Isolation clips and hat channel on one side
- Rating
- STC 57
- At 50 Hz
- –
- At 100 Hz
- 29 dB
- Thick
- 6⅛ in
Riverbank RAL-TL02-34: one ⅝-inch Type X sheet each side, one of them on rubber clips (every third stud) and a metal channel. Its report starts at 100 Hz. Commissioned by the clip’s maker.
-
Double stud wall
- Rating
- STC 58
- At 50 Hz
- 14.9 dB
- At 100 Hz
- 29.7 dB
- Thick
- 9 in
NRC TL-93-270: two rows of 2×4 studs an inch apart, glass-fibre batts in both, one sheet on each outer face.
-
Double stud wall, two sheets each side
- Rating
- STC 66
- At 50 Hz
- 23.7 dB
- At 100 Hz
- 38.0 dB
- Thick
- 10 in
NRC TL-93-272: the same wall with a second sheet on both outer faces.
Four things to take from the list:
- Separation raises the rating, and wins from about 100 Hz up (the double-stud wall from 80 Hz). With one sheet on each side, the three separated walls (channel, staggered studs, double studs) rated STC 46 to 58, against 32 for the plain wall. At 100 Hz the double-stud wall stopped 29.7 dB where the plain wall stopped 16.3, and at 125 Hz it was 33.7 against 12.5.
- At 50 Hz separation costs something, and mass wins it back. With one sheet a side, the separated walls stopped several dB less at 50 Hz than the plain one: 17.7, 15.0 and 14.9 dB against 21.5. The fill differs, so don’t read the gap to the decibel: the plain wall drawn was filled with cellulose and the separated ones with glass-fibre batts, and the NRC’s three plain walls with mineral-fibre batts stopped 20.1 to 22.3 dB. A second sheet on each side won back 5 to 9 dB: 26.8 on the plain wall, 23.7 on the double-stud wall. RP22 gives the reason for the second layer: it doubles the mass, “reducing the resonant frequency of the wall assembly”. One frequency shouldn’t choose your wall: at 100 Hz the two-sheet double-stud wall stopped 38.0 dB and the two-sheet plain wall 20.9. Use both: separated framing and two layers.
- Deep bass is still the hard part. None of the seven walls here with a 50 Hz figure stopped more than about 27 dB there, and the best of the NRC’s other double-stud walls reached 30. For the arithmetic only: if the difference between the two rooms were 24 dB, a 100 dB bass note would arrive at 76 dB, still plainly audible. A wall’s lab figure does not establish that difference, which also depends on the rooms and on every other path. Soundtracks go lower than 50 Hz, and below it the only figures in these reports are one appendix’s 27 dB at 31.5 Hz and 24 dB at 40 Hz for the damped wall, which the report marks “for reference only”. That is why the room’s place in the house comes first.
- The board matters. All six NRC walls used fire-rated Type X drywall. The same double-stud wall in ordinary board rated STC 54, not 58.
Which wall for which target. Joining the two tables, by lab rating:
| Target | Tested walls that reach it |
|---|---|
| STC 52 (kitchen, dining room) | Two damped sheets each side on single studs at 24 in (55); clips with one sheet each side (57); double studs with one sheet each side (58) |
| STC 60 (living room, bedroom, dining room) | Insulated double studs with a second sheet on both sides: 64 to 69 in six NRC tests (and only 55 in two tests with the cavities left empty). With a second sheet on one side only: 59 to 64 in six tests |
| STC 70 and 80 | None of these stud walls. RP22 recommends a consultant at Level 3 and requires one at Level 4 |
The wall RP22’s advice adds up to, clips and channel with two damped sheets on each side, is missing from that table because we found no lab report for it that we could read in full. Sellers publish ratings for it; treat any such figure as a claim until you hold the report for the clip you are buying. The nearest wall the NRC did test has the plain channel RP22 warns against in place of clips, and no compound: single studs, channel on one side and two sheets on each side. In sixteen tests it rated STC 53 to 60 and stopped about 17 to 24 dB at 50 Hz. That is comparison data for a channel wall. It is not a rating or a range for the clip wall, which stays untested here.
If the only room you have shares a wall with a bedroom that must stay quiet, the table is plain: no stud wall here reaches STC 70. Choose another room if you can. If you can’t, build for STC 60 and plan on lower volume late at night.
How to build the shell
RP22 ranks the ways to frame it:
- A room within a room (its own floor, walls and ceiling, touching the house only through isolators) is the most effective. It costs the most space, can meet fire-code objections, and RP22 advises an architect or structural engineer before you try it. A double-stud wall is half of one: it needs a ceiling to match, on its own joists or on clips, and RP22 calls for the plates at the top and bottom of the new wall to be isolated from the house too. It gives no drawing for that joint: ask the clip maker or your engineer how the top of the wall is held.
- Isolation clips and hat channel on the walls and ceiling: rubber-mounted clips screwed to the studs and joists hold a metal channel, and the drywall screws to the channel. RP22: this “can be very effective and is not cost or space prohibitive”. The lab evidence above is thinner than that praise suggests: one clip wall with a single sheet a side (STC 57), and nothing we could read for two damped sheets. Where the target is STC 60, insulated double studs with a second sheet on each side are what cleared it in every test.
- Staggered studs are “the least effective”: the plates top and bottom are still shared, and the method can’t isolate a ceiling.
- Resilient channel, the thin one-legged strip in the third wall above, “is not an effective solution for music or cinema sound reproduction spaces”, RP22 says, whatever its lab rating.
Whichever you choose, RP22 asks for the same details. Fill every stud and joist cavity with fiberglass, cellulose or similar; closed-cell spray foam is “counterproductive”. Use two layers of drywall with a damping compound between them, and finish each layer, ceiling then walls, before starting the next, so the corners overlap. Caulk the gap between the drywall and the floor.
Three practical consequences. Clips, channel and two sheets put the wall’s face well off the studs (about 2⅝ inches with the clip in the tested wall above; other clips differ), so electrical boxes have to be set out to your clip’s figure at rough-in, the stage when wiring and ducts go in while the framing is open. Two ⅝-inch sheets weigh about 4.6 lb per sq ft (the NRC’s floor report lists 22.6 kg/m² for such a ceiling): the clip maker’s layout sets the spacing for that load, and an engineer should confirm that old or light joists can carry it. And separated framing leaves hidden gaps that the building code wants blocked against fire: the model code requires fireblocking in “parallel rows of studs or staggered studs” at the ceiling and floor and every 10 ft along the wall. Ask your building department which materials it accepts, so the fireblocking doesn’t become a rigid bridge between the two rows.
The ceiling and the floor
Sound goes over and under walls, so the ceiling is part of the shell. The NRC tested ordinary wood-joist floors (2×10 joists, a ⅝-inch drywall ceiling) for airborne sound (STC) and for footsteps (IIC, impact insulation class), and printed what each stopped by frequency:
| Ceiling under a wood-joist floor | STC | IIC | At 50 Hz | At 125 Hz |
|---|---|---|---|---|
| Drywall screwed to the joists, empty cavity | 33 | 28 | 21 dB | 16 dB |
| The same, with 6-inch batts in the cavity | 34 | 30 | 18 dB | 18 dB |
| Hung on resilient channel at 16 in, with batts | 50 | 42 | 15 dB | 27 dB |
| The same, with two layers of fire-rated drywall | 53 | 47 | 17 dB | 30 dB |
Insulation does almost nothing until the ceiling is separated from the joists. Then the rating jumps, but look where: the gain starts at about 100 Hz. At 50 Hz no ceiling in the table beats the plain one.
To go further, the NRC’s tests put the mass on the floor above. In the same report, on the same joists, each with batts, channel and two sheets below:
| What is on the joists above | STC | IIC | At 50 Hz | At 125 Hz |
|---|---|---|---|---|
| One layer of subfloor (channel at 24 in) | 55 | 49 | 17 dB | 34 dB |
| A second layer of subfloor (OSB; two plywood versions rated STC 58) | 60 | 53 | 19 dB | 37 dB |
| A 1⅜-inch concrete topping | 70 | 46 | 26 dB | 51 dB |
So under a bedroom, one of three floors with a second layer of subfloor reached RP22’s STC 60 (the other two rated 58), and only the concrete topping moved the figure at 50 Hz. Both are work in the room above, and weight for an engineer to check. Each row here had the hung ceiling underneath. Over a ceiling screwed straight to the joists, the same concrete topping rated only STC 46 to 48, though it stopped as much at 50 Hz (26 to 28 dB): mass does the work in the bass, and the rating needs the hung ceiling as well. The report did not test the clip ceiling RP22 asks for, so it shows what worked in that series, not the only way.
What to build. RP22’s answer for the ceiling itself is the same as for walls: clips and hat channel under the joists, batts in the cavity, two damped layers. We found no published lab test of that ceiling under an ordinary wood-joist floor, so the channel rows above are there to show what separation and mass do, not as a recommendation to use channel. The one matched pair of clip tests we found (commissioned by the clip’s maker, on a heavy floor topped with gypsum concrete) gained 18 points for footsteps and 3 for airborne sound, with 1 to 4 dB more between 80 and 200 Hz.
Lights and speakers overhead. Recessed lights and in-ceiling speakers are holes in the shell, and RP22 gives no tested detail for boxing them in. Its own route keeps the shell whole: it has columns and soffits built inside the shell after the drywall, and suggests columns to hold speakers, outlets and dimmers. A soffit can carry lights and overhead speakers the same way (our extension of its advice). Frame a soffit so that columns or the walls’ own framing carry it down to the floor, and tell the clip maker about anything that will hang from an isolated ceiling: its clips were laid out for the drywall alone. Surface-mounted lights do the same job with no building. What must pass through the shell, a duct or a cable, gets the treatment under The weak points below.
The floor. RP22: “Any temptation to avoid isolating concrete slab floors should be dismissed.” Its method, after the drywall is up: a dense rubber mat 5/16 to ½ inch thick over the slab or subfloor, stopped about ¼ inch short of the walls so it never touches them, then plywood or OSB over the mat, also clear of the walls. The platform and any stage are built on that new floor. RP22 gives no thickness for the plywood and no fixing beyond “an approved mastic”; on a slab, settle moisture first (see the basement guide).
If the room is already finished
There are three rungs, and RP22’s table says which you need:
- Seal it. A solid door with seals, every outlet and gap sealed. No demolition, and no published figure for what it buys alone, but nothing else works without it.
- Add a damped layer. RP22 allows this “where the existing space is already lined”: a second layer of drywall over the existing walls and ceiling, with a damping compound between the layers. The nearest lab test is a new wall, not an old one with a layer added: two ⅝-inch Type X sheets with compound on one side of insulated 2×4 studs at 24 inches, one sheet on the other, “mounted on 1/8″ heavy putty” in the report’s words and built by the maker’s representatives. It rated STC 52 and stopped 20 dB at 80 Hz, which in the lab equals RP22’s Level 1 with nothing to spare. Expect less from a real wall: the NRC’s wall with the same sheet count on studs at 16 inches and no compound rated STC 36. We found no test of a damped layer added to an existing wall, or to any ceiling.
- Strip and rebuild. For STC 60 beside a bedroom or living room, plan on taking the wall you share with it back to the framing and rebuilding it as in a new room. The construction that cleared it in every test is insulated double studs with two sheets on each side (64 to 69 in six NRC tests). With the second sheet on one side only, four of six did (59 to 64), so plan on a second sheet on the neighbor’s side too. Clips with two damped sheets are RP22’s other route, with no lab figure we could read. The wall alone is not enough: sound also goes round it through the ceiling, the floor and the walls that join it (RP22’s warning about flanking paths is below), so plan on at least the damped layer for those. For a ceiling under a bedroom, the NRC’s tests reached STC 60 only with more mass on the floor above as well (the tables above). None of these reports promises a given gain in a particular house.
An upstairs room’s floor is its weak side. The tested fix is more mass on your floor together with a hung ceiling in the room below (the tables above): the concrete topping rated STC 46 to 48 over a ceiling screwed to the joists, and 70 with the hung two-sheet ceiling under it. RP22’s rubber mat and subfloor is its method where height is short; we found no published figure for what it stops.
The popular fix, and what the tests say. Channel or clips over the old drywall, then new drywall: RP22 says not to, because it “will create a triple leaf” (three layers with two air gaps), “resulting in more transmission of sound through the barrier, not less”. The NRC’s tests on ceilings are more mixed than that:
| Ceiling under the same floor | STC | At 50 Hz | At 125 Hz |
|---|---|---|---|
| The existing ceiling, untouched | 33 | 21 dB | 16 dB |
| Channel and a second sheet under it, batts added above | 38 | 20 dB | 21 dB |
| A second ceiling on 3½-inch steel studs under it, with batts | 53 | 16 dB | 29 dB |
| The old ceiling taken down; batts, channel and two sheets | 55 | 17 dB | 34 dB |
The shallow overlay gained only 5 points for all its work: a poor return, though not the loss RP22 predicts. The deep second ceiling came within 2 points of taking the old one down, for 4 inches of height. Neither it nor the rebuilt ceiling stopped as much at 50 Hz as the ceiling they started from. A separate NRC study in 2024, of double steel-stud walls with a drywall layer inside the cavity, found those walls lost 14 to 17 dB around 80 Hz.
So for a finished ceiling: skip the shallow overlay, a poor return in the tests and against RP22’s advice. Add a damped layer, which is RP22’s route though no test of it was found, or take the old ceiling down and rebuild it on clips as RP22 asks (the tested row used channel). A deep second ceiling is a tested alternative if you can spare the height, with an engineer for the load and the fire rating, and against RP22’s advice.
The weak points
RP22 puts it bluntly: “Failure to mitigate even one significant flanking path can negate all other sound isolating efforts.” A flanking path is any way round the wall: a gap, a duct, a door.
- The door. One maker’s table (JELD-WEN) lists its hollow-core doors at STC 24 to 27 and the same styles in solid core at 29 to 32: far below the walls above. The arithmetic is unforgiving. By the standard area-weighted formula, if a 21 × 9 ft wall stops 58 dB at some frequency and a 3 ft door in it stops 28 dB, the two together stop about 38 dB (our arithmetic). RP22’s minimum is a solid-core door 1¾ inches thick with seals round the frame and at the threshold. Its better answers are a door sold and rated as a complete set with its frame and seals, or two doors: it calls a pair back to back with an air gap “always far more effective than a single door”, and a small lobby with a door at each end better still. A wall 6 to 10 inches thick also needs a deeper door frame than a stock one.
- Every gap. In a 100 sq ft wall that stops 40 dB, a hole of 1.4 square inches cuts it to 37 dB, by the same formula (the formula and this example are from a US Forest Products Laboratory report). RP22 calls for all joints to be caulked, a ¼-inch gap around anything that passes through the wall, filled with flexible sealant, and electrical boxes on opposite sides of a wall staggered “by at least one stud width”. An empty 1½-inch conduit is a hole of 1.8 square inches (our arithmetic): seal both ends round the cable with a removable putty once it is through. Loose mineral wool can back the putty, but on its own it is not an airtight seal. Sealing never overrides fire-stopping or the clearances a light fixture needs.
- A window. RP22 says to avoid windows in a high-rated wall. If one must stay, an interior insert helps the middle frequencies more than the bass: in one field test, a ¼-inch acrylic insert 6 inches inside an ordinary double-pane window raised it from STC 31 to 45, but at 125 Hz the gain was 8 dB. Keep an escape window openable (the model code’s rules are above).
- The ducts. RP22 asks for mitigation in any duct that links the theater to another room, such as a silencer, lined duct and several right-angle turns.
Test it before the finishes go on. With the door hung and sealed, play music loudly inside and walk round outside, listening at the door’s edges, the outlets and the grilles. A leak is far easier to fix while the sealant gun is still out.
Keep it quiet
A sealed room has to breathe, and the air system is the usual source of background noise.
The target. RP22 rates background noise with everything running on the NCB scale (a set of noise curves across frequencies, not a single decibel reading; lower is quieter). For its four grades of system it recommends NCB 26, 22, 18 and 15, and allows at most 35, 26, 22 and 18. The first is the baseline; each step quieter costs more duct and more care. These are numbers for an HVAC contractor to design to, not something to judge by ear. For comparison, THX says the ventilation in a THX Certified commercial cinema cannot exceed NC-30, a similar scale, in any octave band.
What to ask the HVAC contractor. The page can’t design the system, but these are the questions:
- Will the room have its own supply and return? A sealed door is no use beside an open grille into the hallway.
- Where does outdoor air come from? A sealed, windowless room needs it, and the model code’s exception for rooms without windows depends on it (the rules are under “Choose the room”).
- A branch off the house system, or a separate unit for this room? And how is the duct kept from carrying sound to the next room?
- What heat has to be removed? Give the contractor the equipment list and the number of seats: people add heat and moisture too.
- Is there a furnace or water heater in or beside the space? Ask how it will get the air it needs once the room is sealed, before the shell is closed.
For the contractor: air speeds, duct lining and dampers (ASHRAE)
Slow air is quiet air. ASHRAE’s handbook lists the air speed at a grille for a quiet room, for when the grille’s maker gives no sound data: about 1.8 m/s (350 ft per minute) at a supply outlet and 2.2 m/s (425 ft per minute) at a return, for the quietest class of room in its table, and lower where several grilles are close together. That class is about RP22’s baseline, on a similar scale; the figures we could read give nothing for RP22’s three quieter grades, and a footnote in the chapter says an experienced acoustical consultant should be retained for rooms meant to be quieter than its RC 30. It also says duct lining needs to be at least 25 mm (1 inch) thick to do much, and that the damper used to set a duct’s airflow belongs 5 to 10 duct diameters back from the grille, with lined duct between. No source we found publishes a tested recipe for a do-it-yourself “dead vent” (a lined box that lets air through a wall).
Move the heat and the fans out. Electronics turn nearly all the power they draw into heat. Multiply watts by 3.41 for Btu per hour (NIST). Epson’s LS12000 projector draws 311 W at full brightness, about 1,060 Btu per hour if all of it ends up in the room, and its fan is rated at 30 dB (22 dB in its ECO mode). Parasound lists one of its power amplifiers at 75 W idle and 125 W at typical listening levels. A rack in a ventilated closet or the next room keeps both heat and fan noise outside. Don’t seal equipment into a tight box to quiet it: Epson wants at least 7.9 inches between the projector and a wall and no closed cabinet without proper ventilation, and Parasound says not to install its amplifier in an unventilated cabinet.
Wiring and power
All of this goes in before the drywall, which is why it comes before the finishes here.
- Leave a path you can pull through. Run the projector’s video cable in conduit so it can be replaced. Size the conduit for the plug: one maker of fiber HDMI cables with a small removable plug asks for conduit of 25 mm (1 inch), or 32 mm (1¼ inches), depending on how the cable is pulled, and an integrator writing for Audioholics recommends 1½ inches, “or 2” if you want maximum flexibility”. Seal both ends afterwards (see “Every gap” under The weak points). Another cable maker puts the last step simply: “Please test the cable before in wall.”
Cable ratings, keeping signal from power, circuits and permits
- Use cable rated for walls. UL’s marking guide lists the families: CL2 and CL3 for speaker and control wiring, CM for communications, with a P suffix for plenum air spaces and R for runs between floors. These are fire ratings; they say nothing about picture quality.
- Keep signal away from power. Anthem’s manual says to route audio and video cables away from power cords to reduce hum. Separately, the electrical code restricts low-voltage wiring from sharing a cable, box or conduit with power wiring; your electrician will know the local rule.
- Circuits. The residential code text we read lets an ordinary 15- or 20-amp circuit serve a mix of lighting and equipment, so nothing there requires a dedicated circuit for a home theater. Large amplifiers can warrant one: Anthem recommends a dedicated 15-amp circuit for each of its Statement M1 amplifiers. Add up what your equipment draws and let the electrician decide, including where the code wants wall outlets.
- Permits. New circuits generally need a permit and an inspection before the wall is closed. Fairfax County, Virginia, for example, requires an electrical permit for new equipment, fixtures and circuits, lets owners apply, and strongly recommends a licensed contractor. We’d leave anything inside the panel to one.
Before the walls close, have these in place. Each one is cheap now and a demolition job later:
| Where | What to run or fit |
|---|---|
| Equipment rack | Every cable run back to it in one piece, labelled at both ends, and written down (CEDIA’s wiring guide); spare network cable; its own ventilation |
| Projector | An outlet, a conduit to the rack, and solid blocking for a ceiling mount. On an isolated ceiling, ask the clip maker how to carry the weight |
| Screen wall | Speaker cable for left, center and right; an outlet for a motorized screen or masking; power and network for a TV if you might use one |
| Subwoofers | A cable and an outlet at more than one spot: Audioholics suggests a run to each side wall and the rear wall, because the best position is hard to predict |
| Surround and overhead speakers | Cable to each position, left coiled where a column, soffit or on-wall speaker will go. A speaker set into the shell itself needs a sealed back box, fixed now and sealed round its edge. A back box does not by itself restore the wall’s mass or its fire rating: ask the speaker’s maker for the complete enclosure detail. We found no tested one |
| Platform, columns and soffits | A capped feed where each will stand: floor outlets under powered recliners, step lights, and whatever the columns hold. They are connected when those are built |
| Lighting | Separate switch wiring or control wiring for general, decorative and step lights |
| Door and wall | Low-voltage wire for a wall controller, and an interconnected smoke alarm |
Make it dark
In a projection room, the brightest part of the picture lights the room, and the room lights the screen back. That washes out dark areas of bright scenes. In one published experiment, the same projector measured 60:1 contrast on a checkerboard pattern in a white-walled room and 295:1 after the room was darkened; its full-on, full-off contrast did not change. That is one room and one projector, not a promise, but the mechanism is general.
- Dark and matte, nearest the screen first. Screen Innovations recommends covered windows and walls and ceiling painted matte black. No source we found publishes a paint reflectance or sheen number to aim for, so judge by eye. Start with the surfaces nearest the screen, the ceiling and side walls beside it and then the floor in front: that order is our reasoning, not a measured ranking.
- Light in layers. Put general light (for cleaning and finding seats), decorative light (sconces or coves) and step light on separate controls, with a movie scene that leaves only the steps lit. Where the platform’s step counts as a stair, the model residential code asks for light of at least 1 footcandle (about 11 lux, a dim glow) at the treads and landings.
- Fabric on the walls is a finish. The model code limits how fast a wall or ceiling finish may spread flame (an index of 200 or less). Buy fabric and panels with a stated fire rating, and keep the paperwork for the inspector.
Rows and the riser
The raised platform for a back row is usually called a riser. The building code uses “riser” for the height of one step, so on this page the platform is the platform and a step’s height is its rise.
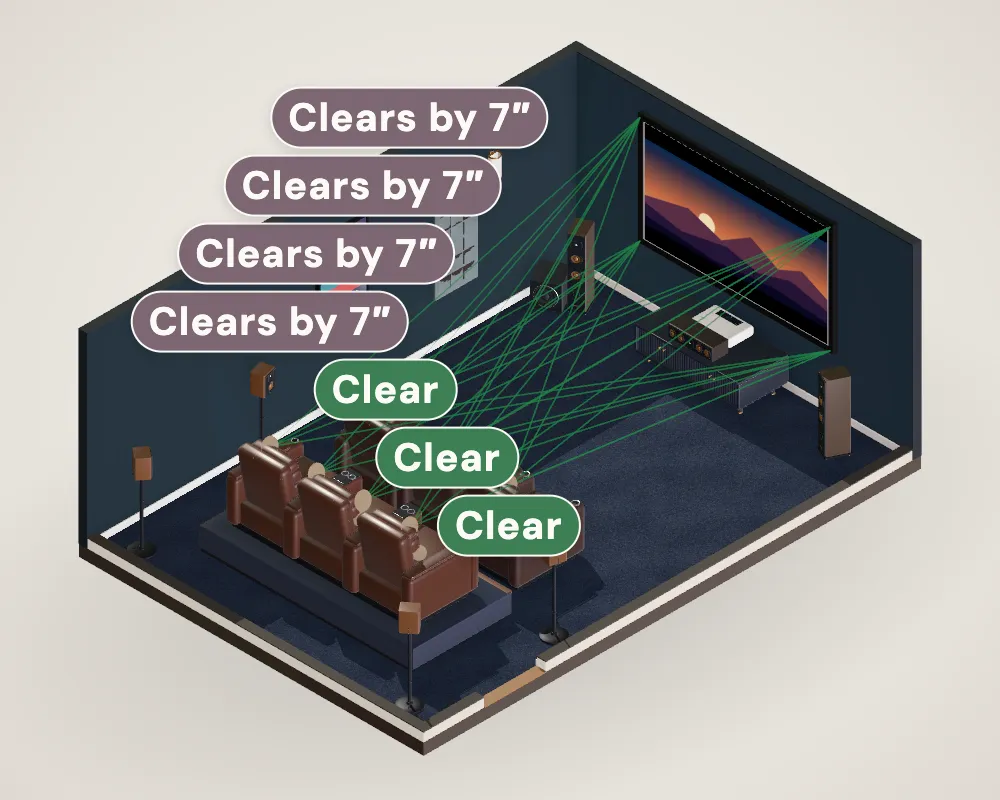
Height comes from sightlines. The back row has to see the bottom of the picture over the row in front. In the example a 15-inch platform puts that line 6 inches above the eyes of an upright front row:
- 6 inhow far the back row’s line to the bottom of the screen passes above the front row’s eyes, with both rows sitting upright.
- 15 inthe platform that gives it: two rises of 7½ in, so one step (dashed), across the aisle.
- 7¾ ftthe ceiling left over the platform (7 ft 9 in) under a 9 ft ceiling, and 6 ft 10 in under the projector, drawn 5 in tall. The model code’s minimum for a room is 7 ft.
| Who is sitting how | Clearance over the front row’s eyes | UNIC cinema handbook |
|---|---|---|
| Both rows sitting upright (drawn) | 6 in | Acceptable |
| Both rows reclined | 7½ in | Acceptable |
| Front row upright, back row reclined | 3½ in | Unacceptable |
Size the platform for how people will really sit. The table under the drawing is the reason: 15 inches works with both rows upright or both reclined, and fails when someone sits up in front of a reclined back row. If that will be common, the same arithmetic asks for about 19 inches here (three rises, so two steps), or a screen mounted higher. Our riser height guide and calculator do the sums for your room.
Riser height calculatorHow high the back row needs to be for your screen, eye heights and row spacing. Open →Depth comes from the seats. A reclining row needs its fully reclined length plus a walkway: Octane lists 66 to 69 inches for two of its recliners, and Seatcraft suggests a platform 6 to 8 feet deep. The example’s platform is 7 ft 9 in deep and runs to the back wall, and it starts 4 inches behind the front row’s seat backs, the room Octane asks for behind its recliners. The sightlines fix where the back row sits, and that leaves 36 inches of walkway in front of it with the seats upright. Fully reclined, a 69-inch recliner that needs 4 inches behind it comes forward about 26 inches (the seats drawn are 38½ inches deep upright) and leaves about 10 (about 13 for a 66-inch one): enough to sit, not to pass: the footrests in between come down before anyone goes in or out. The plan draws those outlines dashed. A longer room, or a back row that doesn’t recline, buys the walkway back.
Steps are stairs, and stairs need room. The model residential code (2021 IRC) defines a stair as “a change in elevation, consisting of one or more risers”, so plan the platform’s step as a stair and ask your building department how it classifies a seating platform. The model figures:
| Item | 2021 IRC model code |
|---|---|
| Height of each step | no more than 7¾ in, all within ⅜ in of each other |
| Tread depth | at least 10 in, with a nosing (an overhang of ¾ to 1¼ in); no nosing is needed at 11 in or more |
| Width of the step | at least 36 in |
| Landing at the top and the bottom | at least 36 in deep in the direction you walk, and as wide as the step |
| Headroom over the step | at least 6 ft 8 in |
| Ceiling height in the room | at least 7 ft |
| Handrail | where a flight has 4 or more rises |
| Guard | where the walking surface is more than 30 in above the floor |
| Floor load to design for | 40 lb per sq ft (live load) |
The landing is the row that catches people out, twice. A step that sticks out sideways into a narrow aisle leaves no landing at its foot. And a step that comes up in front of the back row puts its top landing where a recliner’s footrest goes: by the arithmetic above, a reclined seat would leave about 10 inches of it. So in the example the door is beside the front row, and the step, with an 11-inch tread, runs across the aisle behind the door, where the platform begins. The aisle in front of it is its bottom landing and the way to the front row; its top landing is the platform beside the back row, 36 inches deep, which no seat reclines into. A third thing can take a landing’s width: the surround speaker on the aisle’s wall, which stands 5½ inches off it at about head height. So the example’s seats and screen sit 3 inches off the room’s center line, away from the door. That makes the aisle about 42 inches wide, and leaves 36 inches clear beside the speaker on the step and on both landings. The 15-inch platform needs one step of 7½ inches, and under a 9 ft ceiling it leaves 7 ft 9 in overhead.
The example’s second row needs about 8½ ft to start with, if the 7 ft is measured from the platform. A 15-inch platform under the model code’s 7 ft, plus a clip ceiling (2⅝ in with the tested clip) and a mat and subfloor (about 1¼ in, for a ½-inch mat under a ¾-inch panel), comes to 8 ft 7 in from the old floor to the underside of the joists. Under an ordinary 8 ft ceiling the same platform leaves about 6 ft 5 in. (The example’s 9 ft is its finished height, after that work.)
If your ceiling is under about 8½ ft: the sums, and the fallbacks
| Floor to joists now | Finished ceiling, with a clip ceiling and a new floor | Left over a 15 in platform |
|---|---|---|
| 7 ft 9 in | about 7 ft 5 in | about 6 ft 2 in |
| 8 ft | about 7 ft 8 in | about 6 ft 5 in |
| 8 ft 7 in | about 8 ft 3 in | 7 ft |
| 9 ft | about 8 ft 8 in | about 7 ft 5 in |
The model code asks for 7 ft in a room and 6 ft 8 in over a step, and we found nothing in it on whether a seating platform counts as the floor. If it does, a 15-inch platform leaves less than 7 ft over it in any room that starts under about 8 ft 7 in; ask the building department how it measures before you design one.
If it measures from the platform, the fallback is one row, or a lower platform, which needs a smaller picture mounted higher. By the side view’s arithmetic a single 7-inch rise needs the bottom of the picture about 46 inches up. Under an 8 ft ceiling (7 ft 8 in finished) that leaves 7 ft 1 in over the platform and room for a screen of about 85 to 90 inches, depending on its frame, not 120: a 120-inch picture is 59 inches tall. Under 7 ft 9 in even the 7-inch platform leaves less than 7 ft. The riser calculator shows what each inch of platform and screen height buys.
Build it last, inside the shell. RP22 puts platforms and stages after the drywall, on the finished floor, so the shell behind and under them is complete and sealed. One documented build used 2×8 joists at 16 inches under two layers of ¾-inch OSB, glued and screwed, with mineral wool inside so the box doesn’t “act like a drum”. That is one builder’s account, not an engineered plan: your floor, spans and seats decide the framing. RP22 notes that a platform inside the shell can be made to work as a bass trap, but the designer Nyal Mellor of Acoustic Frontiers warns that “just cutting a few vents in here and there will not turn your riser into a bass trap”. And don’t screw the platform through isolated walls into the house’s framing: that bridges the isolation you paid for.
The screen wall
There are two ways to arrange the front of the room:
Beside and below the screen. Nothing built; voices come from just under the picture.
Behind the screen. Voices come from the picture; the false wall takes 2 ft or more of the room.
- Speakers beside and below the screen, as in the example. Simple, and any screen that suits the projector will do.
- Speakers behind an acoustically transparent screen, so voices come from the picture. The screen then sits in a false wall with the speakers behind it, built inside the shell like the platform.
What a screen costs in sound: one study’s measured losses
What a screen costs in sound. A study by Newell, Guijarro García and Holland (2013) measured unnamed samples in an anechoic chamber (a room with no echoes), with a speaker behind each:
| Loss in dB, by screen sample | 5 kHz | 10 kHz | 16 kHz |
|---|---|---|---|
| Woven, speaker 15 cm behind | 0.95 | 1.41 | 2.32 |
| Mini-perforated, 15 cm behind | 2.86 | 7.17 | 9.17 |
| Mini-perforated, 60 cm behind | 4.40 | 8.40 | 11.34 |
A second woven sample lost about 2.5 dB at 5 kHz, and the study’s text gives about 4 dB at 5 kHz for the perforated one where its table says 2.86. Ask for the measured loss of the screen you are buying. Every distance from 2 to 60 cm showed some comb filtering (ripples in the treble where sound bounced between speaker and screen interferes with the direct sound), so there is no perfect gap.
How far behind. RP22 recommends at least 150 mm (6 inches) between speaker and screen, depending on the speaker, and absorbing material on the wall behind the screen, effective down to at least 500 Hz, to soak up what the screen reflects. Stewart Filmscreen’s own paper asks for 12 inches behind its perforated screens. Add the depth of the speakers themselves when you set the false wall. Equalization (electronic correction of the speaker’s response) can restore the lost treble, but RP22 notes that it uses up amplifier and speaker headroom.
Can you see the holes? With perforated screens it depends on distance and on how bright the picture is. Stewart says its standard perforations stop being visible at 15 ft and its smaller MicroPerf at 12 ft, at a picture brightness of 12 foot-lamberts. Those figures are for its own products. For any screen, perforated or woven, ask for a sample and look at it from your seat.
Treat the room
Isolation keeps sound in; treatment makes it sound good inside. Do it after the shell is finished, and keep it modest: the aim is clear dialogue and even bass, not a dead room. RP22’s target is a decay time (how long sound takes to fade) of about 0.3 seconds for a room of 100 m³; the example is 80 m³. Our guide to reducing echo explains the target and how much absorption reaches it.
- Side walls. Absorbing panels go where the side walls bounce the front speakers toward the seats. In the example those points fall between about 3 and 9 ft from the screen wall for the three front seats, which is where the plan draws the panels. Our panel placement guide shows how to find them in your room.
- Corners. Bass traps work best in corners, starting with the front ones.
- Two rows, more than one subwoofer. RP22 names the number and position of subwoofers among the main ways to even out bass, and two rows give it more seats to even across. Our setup guide covers placing two; the cable for them goes in at rough-in.
A themed room that still works
The old movie palaces, starship bridges and Art Deco lobbies people build are what make a dedicated room fun. Almost all of it is built inside the finished shell, after the drywall is sealed, the same as the platform. The rule that keeps it working: give each themed element one job, and choose its material for that job.
- Fabric walls. Stretched-fabric systems clip fabric into a track with a core behind it; one maker (FabricWall) sells track ½, ⅝, 1 and 2 inches deep. The core decides what the wall does: absorbing panel where you need treatment, hard board where you don’t. Fabric that sound must pass through should be sold as acoustically transparent: Guilford of Maine rates its FR701 at 95% by its own test.
- Speaker covers. Hide speakers only behind that kind of fabric. One integrator’s published project (Station Earth) stretched it over frames in the millwork in front of its speakers and subwoofer. Acoustic Geometry sells the same printed wall art two ways, filled as an absorber or hollow as a speaker cover; a speaker behind the filled kind would be muffled.
- Curtains and a proscenium (the frame around the screen). Heavy drapes absorb treble far more than bass. In a lab test commissioned by its seller, a 25-ounce velour hung in full pleats 4 inches off the wall absorbed nearly all the sound from 500 Hz up but little more than a quarter of it at 125 Hz. A little frames the screen well; a room draped all round sounds dull while the bass still booms. Keep gathered cloth away from speakers: Dolby’s 1994 cinema guidelines warn that “bunching” cloth in front of a loudspeaker can cause severe loss of high frequencies.
- Columns and soffits. These do real work. Fill them with the panels and bass traps the room needs. RP22 suggests columns for speakers, outlets and dimmers, so that those don’t go in the shell’s walls; a soffit can do the same for lights.
- A star ceiling. It suits a theater because the ceiling stays black. Allow for its depth and cost: one panel system (Starscape) is 10 mm thick and hangs 42 mm (1⅝ inches) below the ceiling; one maker’s fiber-optic tiles for a drop-in grid (Acoustic Geometry) list at $2,599.99 for ten 2 × 2 ft tiles, $65 per square foot, which would be about $20,500 over the whole of the example’s ceiling. Keep it dimmable, and off during the movie.
- Glass, gloss and light. Glass, glossy paint and bright surfaces near the screen reflect the picture’s light back at it, the same effect as light walls. Put them at the back of the room, or choose matte.
Put together, a movie-palace look that keeps to those rules: dark matte walls with fabric panels (the room’s absorbers) between columns that hold the surround speakers, sconces and outlets, none of them standing in a landing; a velour proscenium round the screen, clear of the speakers; stars over the back two-thirds of the ceiling; sconces and step lights on dimmers; carpet. Every piece of it is fixed to the finished shell, not cut into it.
No source we found publishes measurements of what a typical prop, column or framed poster does to the sound, so we can’t give you a number for those. If speakers go into a built front wall, RP22’s advice on baffle walls (a solid wall the speakers sit flush in) applies: mount them on isolating pads with no rigid contact with the wall, and if that can’t be done properly, don’t build them in.
The order of work
This is the order the pieces above fit together: the shell first, then everything built inside it. Tick items as you go; the page remembers them on this device.
You work an owner can do Hire a licensed trade or an engineer You or hire by the job and your local rules Inspector wait for approval before going on
1
Plan
0/62
Frame and rough in
0/63
Close the shell
0/64
Build inside the shell
0/65
Finish
0/46
Equip and calibrate
0/3
In a finished room the same order holds, shortened: wiring changes and their inspection, then the damped layer (ceiling, then walls), the seals and the door. Where you strip a wall or ceiling to rebuild it, that part joins at “Frame and rough in”.
The shell-first order is RP22’s: it puts the drywall “before the installation of any architectural acoustical treatment elements such as columns, soffits, stages, or raised seating platforms”. The inspection points come from one county’s published order, Loudoun County, Virginia: rough-in inspections, then framing (“OK to insulate after approval”), then insulation (“OK to close-in walls & ceilings after approval”), then a final inspection, with all wiring inspected before it is concealed. Your permit lists the ones that apply to you, and your state decides which electrical work an owner may do.
What it costs
Published figures disagree mainly because they count different things, so don’t average them.
| Published figure | What it counts |
|---|---|
| $13,000–32,000 mid-range, $65,000 and up high-end CEDIA, undated | The low end of its mid-range is a large TV; the high end a projector, screen and surround sound. The top tier may include custom building |
| $20,000 average, most $10,000–60,000 HomeAdvisor, June 2026 | Equipment and installation. It also says installing a home theater can run $80–200 per sq ft |
| $15,000–50,000 Angi, July 2026 | A large or dedicated theater of 400–800 sq ft |
| $20,000–70,000 Fixr, January 2025 | An addition or converted room with soundproofing, seating, carpet and lighting |
| $62,500 median CE Pro, 2025 survey | Dedicated theaters installed by professional integrators |
None of them separates the room from the equipment the same way. For the equipment alone, our setup guide prices complete systems from $1,500 to $25,000.
If you do the carpentry yourself, the shell is mostly materials. These are prices we read on the sellers’ own pages on October 9, 2026 (Home Depot’s for its Springfield, Virginia store); yours will differ:
| Material | Price read | Covers |
|---|---|---|
| ⅝-inch Type X drywall, 4 × 8 ft sheet (USG Firecode X) | $15.77; $13.40 each for 26 or more | 32 sq ft |
| Fiberglass batts, 3½ inches thick (Owens Corning R-13) | $95.26 a bag | 106.6 sq ft |
| Mineral wool batts, 3 inches thick (Rockwool Safe’n’Sound) | $83.98 a bag | 59.7 sq ft |
| Damping compound, 28-ounce tube (Green Glue, at IsoStore) | $28; $308 for a case of 12 | about 16 sq ft |
| Isolation clips (RSIC-1, at Acoustical Solutions) | $199.99 for 50 | set by the maker’s layout |
| Hat channel, ⅞ inch deep, 25 gauge. Check that it suits your clip | $14.98 | 10 ft |
For the example room, walls and ceiling come to 963 sq ft. Two layers of drywall is 61 sheets, the compound between them 61 tubes, and one 3½-inch layer of fiberglass in the cavities 10 bags (deeper joist cavities, or a second row of studs, take more): about $3,300 (about $3,800 with mineral wool). Clips and channel depend on the maker’s layout. Spaced like the tested clip wall above (30 clips and six rows of channel on a 14 × 9 ft wall), the room would take about 230 clips and 65 lengths of channel, about $2,000 more: about $5,300 in all. Two layers, or a ceiling, may need them closer. That is our arithmetic for one room, not a quote, and it counts only those five materials: no lumber, fasteners, sealant, waste, tax or delivery.
For a finished room, one added layer (a sheet and two tubes of compound for every 32 sq ft) comes to about $2.00 to $2.25 per sq ft of wall or ceiling at these prices, by the case or by the tube.
Not priced here: framing lumber, a rated door set and its seals, a floor mat, the electrician and the air system. We found no figures for them that we could tie to a comparable room, so get quotes; the checklist above marks which work is usually hired. One marker for the door: a 30-inch solid-core slab at the same store was $246.17 (the example’s door is 36 inches). We did not confirm that slab’s thickness: RP22 wants 1¾ inches, so measure before you buy.
Mistakes to avoid
- Framing the platform or screen wall before the drywall, which leaves the shell open behind them.
- Chasing a perfect room ratio instead of avoiding the bad ones.
- Buying panels to stop sound leaving. That takes construction, not treatment.
- Reading STC as a bass rating. It starts at 125 Hz, and a higher rating can stop no more at 50 Hz.
- Building heavy walls around a hollow door, an open duct, an empty conduit or a plain ceiling.
- A shallow layer on channel or clips over an old wall or ceiling. Add a damped layer directly, or strip it.
- A step that sticks out into the aisle, with no landing at its foot, or a landing that a reclined seat or a wall speaker reaches into.
- Sizing the platform for reclined viewers only, then sitting up in the front row.
- Sealing the projector or rack into a box with no way for heat to leave.
- Glossy or light surfaces beside the screen.
- Closing the walls before the cables are tested and the inspections passed.
- Budgeting from an average that doesn’t count what you are building.
Questions people ask
How big does a dedicated home theater room need to be?
No standard we found sets a minimum. CEDIA’s consumer cost guide says mid-range setups typically need a dedicated room of at least 12 × 15 feet, and its RP22 design practice gives proportions instead of sizes: a length 1.15 to 1.45 times the width, and a width more than 1.1 times the height. Two reclining rows need length: our example uses all of 21 feet. Measure what is left inside the new walls, then plan from the seat.
Can you soundproof a home theater against bass?
Only partly. STC, the usual wall rating, covers 125 Hz to 4 kHz, which starts above most movie bass. In Canada’s National Research Council tests, a double-stud wall with two sheets of drywall on each side, rated STC 66, stopped 38 dB at 100 Hz but only 23.7 dB at 50 Hz. None of the four ordinary wood-joist ceilings in our first table stopped more than 21 dB at 50 Hz; in the same report, wood-joist floors with a 35 mm concrete topping stopped 22 to 28 dB. Heavy, separated, airtight construction helps, but expect some bass in the next room and place the theater away from bedrooms where you can.
Can I soundproof a room that is already finished?
Partly, without tearing it out. CEDIA’s RP22 allows a second layer of drywall over the existing walls and ceiling with a damping compound between the layers. One new lab wall with that make-up, on insulated studs at 24 inches, rated STC 52; no published test we found covers a layer added to an existing wall or ceiling, so expect less. RP22 warns against fixing resilient channel or isolation clips over an existing wall and boarding over them: that makes a third layer with a small air gap, which it says lets more sound through, not less. The tested walls here that reached RP22’s STC 60 beside a bedroom every time are new insulated double-stud walls with two sheets on each side (with the second sheet on one side only, four of six did), so plan on stripping a shared wall to the framing and rebuilding it; in the NRC’s tests a ceiling got there only with more mass on the floor above.
Do I need a permit to build a home theater room?
Often, yes. Converting or altering a room, adding circuits and changing ductwork commonly need permits and inspections before the walls are closed, and the rules are local. As one example, Fairfax County, Virginia requires an electrical permit for new circuits and equipment, and Loudoun County inspects all wiring before it is concealed. Ask your building department first.
Can a home theater have no windows?
It depends on your local code. The 2021 model residential code asks for window area in a habitable room unless the room gets outdoor air mechanically and has enough artificial light, and it requires an emergency escape opening in basements and bedrooms, with an exception for alterations of existing basements that do not add a bedroom. A cover over an escape window must come off from the inside without a key, tool or special effort. Ask your building department before you block or remove a window.
How much does a dedicated home theater room cost?
Published figures differ because they count different things. Angi (2026) puts a large or dedicated theater of 400 to 800 square feet at $15,000 to $50,000, and Fixr (2025) puts a converted room with soundproofing, seating, carpet and lighting at $20,000 to $70,000. CE Pro’s 2025 survey of professional integrators found a median of $62,500 for the dedicated theaters they installed. An owner doing the carpentry pays for materials: for our example room, about $3,300 for the shell’s drywall, damping compound and insulation at October 2026 prices, or about $5,300 with isolation clips and channel. Lumber, the door, the floor and the electrician and air system are extra.
Does a themed theater hurt the sound or picture?
It doesn’t have to. Give each themed element one job: decoration, sound absorber, speaker cover or light. Hide speakers only behind acoustically transparent fabric, never behind solid panels or gathered curtains, keep glossy or bright surfaces away from the screen, and remember that heavy drapes absorb treble far more than bass, so a room draped all round sounds dull, not controlled.
Do speakers behind the screen lose sound?
Some treble, and it depends on the screen. In one anechoic study a woven sample lost about 1 to 2 dB between 5 and 16 kHz with the speaker 15 cm behind it, and a mini-perforated sample about 3 to 9 dB. CEDIA’s RP22 recommends at least 6 inches between speaker and screen, and reminds you that correcting the loss with equalization uses up amplifier headroom.
Sources
- CEDIA / CTA (2023). CEDIA/CTA-RP22 Immersive Audio Design Recommended Practice, v1.2.Standard
- J. H. Rindel, JASA Express Letters 1(2), 021601 (2021). Preferred dimension ratios of small rectangular rooms.Research
- CEDIA. Home theater costs.Professional guide
- National Research Council Canada (1998). Gypsum board walls: transmission loss data (IRC-IR-761).Measurement
- Orfield Laboratories, for Audio Alloy (2005). Sound transmission loss test OL 05-1049 (damped double drywall on 2×4 studs).Measurement
- Orfield Laboratories, for Audio Alloy (2005). Sound transmission loss test OL 05-0416 (damped double drywall on one side).Measurement
- Riverbank Acoustical Laboratories, for Kinetics Noise Control (2002). Sound transmission loss test RAL-TL02-34 (isolation clips and hat channel).Measurement
- A. C. C. Warnock and J. A. Birta, National Research Council Canada (1998). Summary report for consortium on fire resistance and sound insulation of floors: STC and IIC results (IRC-IR-766).Measurement
- A. C. C. Warnock and J. A. Birta, National Research Council Canada (2000). Detailed report for consortium on fire resistance and sound insulation of floors (IRC-IR-811).Measurement
- J. Mahn, S. Skoda and I. B. Cunha (National Research Council Canada), Canadian Acoustics 52(3) (2024). The transmission loss of double stud walls with layers of gypsum board installed inside the wall cavity.Research
- Intertek ETL SEMKO, for Kinetics Noise Control (2006). Floor-ceiling tests AT001081 and AT001085 (drywall ceiling fixed directly and on isolation clips).Measurement
- JELD-WEN (2023). Acoustic ratings: interior doors.Manufacturer
- R. E. Jones, USDA Forest Service, Forest Products Laboratory. Lab-field correlations for airborne sound transmission through party walls.Government
- BCIT Centre for Architectural Ecology (2016). Indow windows: field sound transmission loss testing.Measurement
- THX (2016). How is background noise tested?.Professional guide
- ASHRAE (2019). HVAC Applications handbook, chapter 49: noise and vibration control.Professional guide
- NIST (2025). Guide for the Use of the International System of Units (SP 811), appendix B.8.Government
- Epson. Pro Cinema LS12000 user’s guide.Manufacturer
- Parasound. Halo A 23+ owner’s guide.Manufacturer
- Screen Innovations. Screen FAQs.Manufacturer
- ProjectionDream (2015). Contrast vs projector vs environment.Measurement
- ProjectorCentral. Projector contrast ratio.Professional guide
- International Code Council (2021). International Residential Code 2021, Chapter 2: definitions.Standard
- International Code Council (2021). International Residential Code 2021, Chapter 3: building planning.Standard
- Virginia Department of Housing and Community Development (2021). 2021 Virginia Construction Code (amendments to the IRC).Government
- International Union of Cinemas (UNIC) (2021). UNIC Cinema Technology Handbook (v2).Professional guide
- Rogue Engineer (2019). Home theater riser construction.Rule of thumb
- Acoustic Frontiers (2016). Adding a home theater riser to an enthusiast’s room.Professional guide
- Octane Seating. Riser platform and Flex HR riser series: dimensions.Manufacturer
- Seatcraft. Two-row home theater seating.Manufacturer
- Newell, Guijarro García and Holland, Proceedings of the Institute of Acoustics 35(2) (2013). An investigation into the acoustic effect of cinema screens on loudspeaker performance.Measurement
- A. C. Brawn, for Stewart Filmscreen. Defining the difference in perforated screens.Manufacturer
- UL (2019). Wire and Cable Marking and Application Guide.Professional guide
- Anthem (2011). Statement M1 operating manual.Manufacturer
- Anthem (2024). MRX/AVM operating manual.Manufacturer
- RUIPRO. 8K fiber-optic HDMI cable, CL2 rated: installation notes.Manufacturer
- ERARD. How to properly install a 4K HDMI fiber optic cable.Manufacturer
- CEDIA (2026). The ultimate smart home wiring guide.Professional guide
- Ray Adkins, Audioholics (2007). Home theater AV cable prewire basics 101.Professional guide
- Cliff Heyne, Audioholics (2015). Professional pre-wiring tips for speakers, TVs and networking.Professional guide
- International Code Council, via UpCodes (2024). International Residential Code 2024, E3702.4: branch-circuit ratings (as adopted in Texas).Standard
- International Code Council, via UpCodes (2024). International Residential Code 2024, E4304.1: separation from other conductors (as adopted in Texas).Standard
- Fairfax County, Virginia. Electrical permits: residential.Government
- Fairfax County, Virginia. Addition or alteration: residential.Government
- Loudoun County, Virginia (2025). Finished basement guidelines.Government
- Station Earth (2025). Go Big and Stay (project case study).Professional guide
- Acoustic Geometry. Wall art: hidden absorption and speaker covers.Manufacturer
- FabricWall. Track.Manufacturer
- Guilford of Maine (2023). Acoustical performance for panel applications: FR701 2100.Manufacturer
- NGC Testing Services, for Rose Brand (2014). Sound absorption test: Memorable 25 oz velour drape with 100% fullness (NGC 4014027).Measurement
- Starscape Star Ceilings. Infinity star ceiling panels.Manufacturer
- Acoustic Geometry. StarField ceiling tiles.Retail price
- Dolby Laboratories (1994). Technical guidelines for Dolby Stereo theatres.Professional guide
- HomeAdvisor (2026). How much does home theater installation cost in 2026?.Rule of thumb
- Angi (2026). How much does home theater installation cost? (2026 data).Rule of thumb
- Fixr (2025). Home theater installation cost.Rule of thumb
- CE Pro (2025). Multipurpose media rooms surge on projects in 2025 (home entertainment market research).Research
- The Home Depot (2026). USG Sheetrock Firecode X drywall panel, 5/8 in × 4 ft × 8 ft (model 14211011308).Retail price
- The Home Depot (2026). Owens Corning R-13 unfaced fiberglass batts, 15 in × 93 in (model E51).Retail price
- The Home Depot (2026). Rockwool Safe’n’Sound stone wool batts, 3 in × 15¼ in × 47 in (model RXSS31525).Retail price
- IsoStore (2026). Green Glue noiseproofing compound tubes.Retail price
- Acoustical Solutions (2026). Resilient sound isolation clip (RSIC-1), box of 50.Retail price
- The Home Depot (2026). Super Stud 7/8 in × 10 ft 25-gauge galvanized steel furring channel (model 78100).Retail price
- The Home Depot (2026). Kimberly Bay 30 in × 80 in solid-core interior door slab (model DPSHA1W30).Retail price
Numbers on this page follow these sources. Where a figure is our own calculation or a rule of thumb, the text says so. Found a mistake? Tell us.